We are reader-supported. When you buy through links on our site, we may earn an affiliate commission.
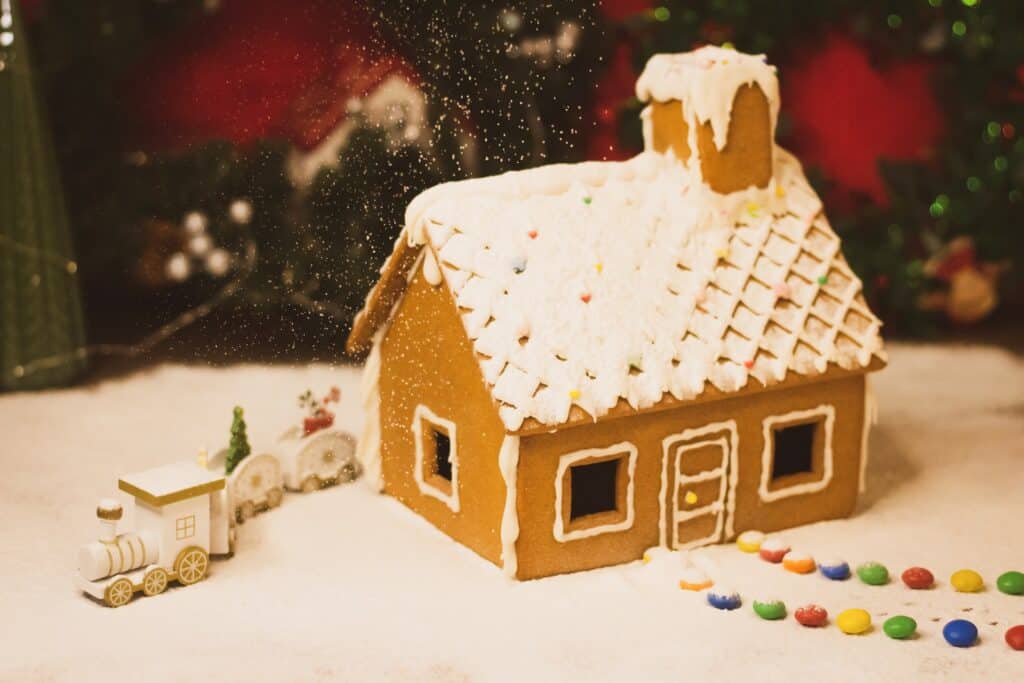
Is your brain full of fabulous gingerbread house ideas?
We all want to design and build our dream houses — eventually — but for most of us, that kind of investment isn’t in the cards. That doesn’t mean that you have to limit yourself to your imagination. Why not turn your dream house design into a tasty one made of gingerbread? Here are some step by step instructions to help you create the perfect gingerbread house design for your dream gingerbread construction.
Every good dream house starts with a design, whether you’re building it from gingerbread or wood and stone. Start by sketching your design and laying out the kind of house you want to create. You can make nearly anything out of gingerbread as long as you’re patient, regardless of your skill level.
Don’t forget to include measurements in your sketch, so you know exactly how large a structure you’re trying to construct. This will come in handy during step three, but we’ll get into that in a minute.
This step is only limited by your imagination and the amount of gingerbread you’re willing to bake. Do you want a three-story Victorian mansion with gumdrop gables and a wrap-around porch? Maybe your dream house has a pool or a movie theater in the basement. Let your imagination run wild.
Step two will vary from person to person, depending on your preferred gingerbread recipe. What you need is a stiff cookie that will stand up to the rigors of construction and decorating. This won’t be your standard gingerbread cookie recipe — those cookies are designed to be soft in the center, which doesn’t make them super useful for construction.
If you don’t have a favorite gingerbread recipe, here’s a simple one from the Food Network to get you started.
Refrigeration is one step that you absolutely cannot skip before you move on to step three. If you don’t chill your dough before you roll it out, it will spread and lose its shape in the oven. You want your dough to be as cold as possible while still being able to roll it. Don’t freeze it — 30-45 minutes in the fridge should be more than sufficient. Once it’s chilled, move on to step three.
Now it’s time to get your hands dirty. Pull your dough out of the fridge, one batch at a time, and start rolling it out to a thickness of about ⅜ of an inch. A rolling pin with a guide can be incredibly useful if you’re not used to eyeballing thicknesses. This is where those measurements you created in step one will come in handy. Once it’s rolled out to your desired thickness, break out a ruler and start cutting.
You’ll need to individually shape each of the pieces for your dream gingerbread house — walls, ceilings, and any decorative pieces that you’re planning to bake rather than make from icing or candy. Cutting things to these measurements means that if something goes wrong during baking or a piece breaks, you can always cut and throw a replacement in the oven.
Now, bake your carefully cut shapes according to the directions in your recipe. While you’re baking, move on to step four.
If the gingerbread cookies in your oven are the bricks of your dream house, then the icing that you need to make for this step is the mortar. The trick here is to perfect the royal icing that you’re going to use to hold everything together.
Royal icing should be thin enough to pipe and spread, but it should also solidify fairly quickly, allowing you to use it to hold everything together. A basic royal icing recipe is relatively simple — three egg whites, one pound of powdered sugar, and ½ a teaspoon of cream of tartar. Beat all of your ingredients together until they form soft peaks. That’s it – it’s ready. Keep it covered to keep from hardening too quickly.
You can also use buttercream to assemble your house or attach decorations. It takes significantly longer to harden, but it can be easier to work with than royal icing. Just make sure your cookies are completely cool before you start assembling them or the buttercream will melt. If you’re feeling entirely lazy, you can also use melted white chocolate to hold things together.
To get started on your gingerbread construction, you’ll want to refer back to that gingerbread house design you created in step one. This step is our second favorite. The only thing that is more fun is decorating but we’ll get to that in a minute. Start assembling your dream house, one wall at a time. Make sure your walls are secure and stable before you start attaching upper floors or roofs.
Keep your workspace as cool as possible, especially if you’re using buttercream for assembly. The frosting can be incredibly finicky and the last thing you want is for your dream home to collapse in on itself because it’s a touch too warm in your kitchen or living room. That is probably part of the reason that gingerbread houses are so popular in the winter — because you don’t have to worry about them melting!
This step is probably the most fun when it comes to gingerbread construction — the decorations. This is where you can really go crazy and let your imagination run wild. Collect a bunch of your favorite candies and go to town. You can attach nearly anything to the exterior of the gingerbread house with the same icing you’re using for assembly.
You may have to flex your creative muscles here to make peppermints and gumdrops look like things you’d want to see in your dream house, but the sky is the limit. Want to build a swimming pool? Surround it with gingerbread bricks and fill it with blue-tinted buttercream. Strips of licorice make delightful television screens and dark windows, and flat candies like Necco wafers are perfect for creating shingles.
This is where you can take a generic gingerbread house and make it entirely yours. Don’t let anyone tell you what you can and can’t do with your dream house. You’re only limited by your imagination and the amount of icing you made.
Now that you’ve finished assembling your dream gingerbread house, what comes next? You can show it off to all your friends on social media, enter it into a gingerbread building contest, store it for next year — after you seal it with varnish — or just snack on it. The choice is yours!